For the first blog on this new site I wanted to talk about a simple technique to get LetsEncrypt certificates for internal devices (those not exposed to incoming Internet connections).
Some may ask why do this – isn’t it exposing information about your internal network to the outside world. Well, yes. However, I want to have https access to a number of internal devices using a trusted root certification authority. My ability to secure this method is also much greater than rolling my own PKI infrastructure, which has the added disadvantage that certain clients may not allow you to add additional root certificates (think appliances, etc). In short, as with anything in the security arena, it is a risk-based decision.
LetsEncrypt offers a number of challenge types. The main one is known as HTTP-01 and is the classic “put something on the server” challenge. The other main one, which we will be using, is DNS-01. Here we add something to DNS to prove ownership. As documented on the LetsEncrypt website, this challenge types honors CNAME entries.
The certbot utility offers a number of DNS plugins for major providers. There are potential issues you may face. First, you may not use any of the listed providers. Second, the interface/API used may be an all-or-nothing access to your domain thus giving the server unfettered access. I did try the more generic DNS plugin with issues in it following CNAMEs. For me, one of my providers only offers a web interface.
Whilst there are likely other utilities and ways to do this, I will be using certbot and the manual method to gain a certificate for my internal development VM for this site, called dev.SimulatedAttack.com. This has no external DNS entry.
A simplified layout of the parts is shown here:
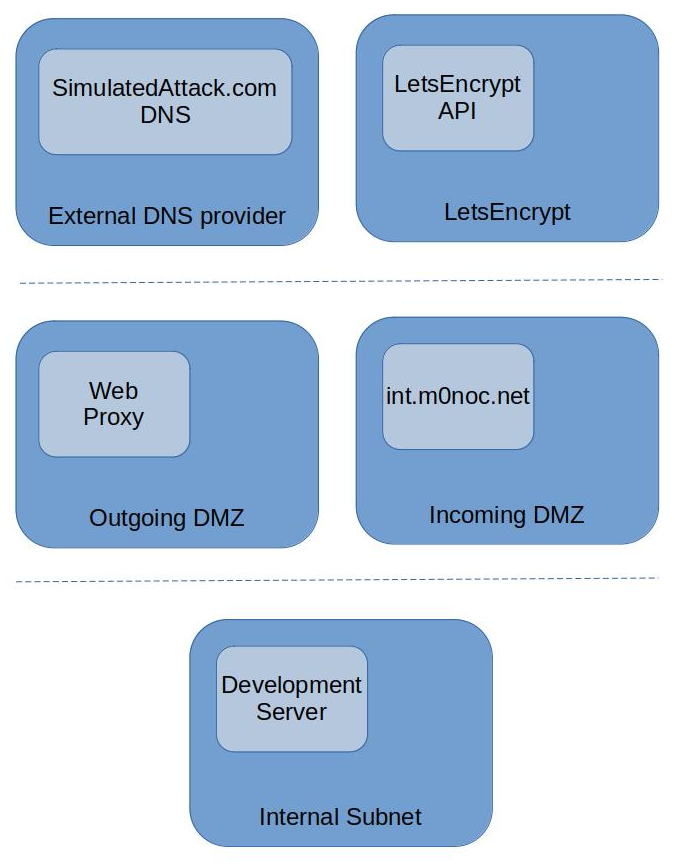
The development server can only talk to the Internet via the Web Proxy. It can see the int.m0noc.net externally authoritive domain as well. The LetsEncrypt API can only see the external providers DNS server and the (internal to my network) int.m0noc.net server.
In the SimulatedAttack.com domain we add the following CNAME record (potentially by asking the provider if the web portal rejects names with an underscore). This is a one off activity.
_acme-challenge.dev IN CNAME _acme-challenge.simattdev.int.m0noc.net.
This effectively makes the int.m0noc.net DNS domain the validation endpoint.
The simiplified flow to getting the certificate then becomes:
- Dev Server (via proxy) -> LetsEncrypt API (Please provide me with a certificate for dev.simulatedattack.com using the DNS-01 challenge)
- LetsEncrypt API -> Dev Server (Sure, here is the challenge)
- Dev Server -> int.m0noc.net DNS (Set _acme-challenge.simattdev.int.m0noc.net. to this challenge)
- int.m0noc.net DNS -> Dev Server (Done)
- Dev Server (via proxy) -> LetsEncrypt API (I’ve set the challenge, please provide me with a certificate)
- LetsEncrypt API -> simulatedattack.com DNS (Give me the value of _acme-challenge.dev.simulatedattack.com)
- simulatedattack.com DNS -> LetsEncrypt API (Sure, but its a CNAME, the real value is at _acme-challenge.simattdev.int.m0noc.net)
- LetsEncrypt API -> int.m0oc.net DNS (Give me the value of _acme-challenge.simattdev.int.m0noc.net)
- int.m0noc.net DNS -> LetsEncrypt API (Sure, here is the TXT value)
- LetsEncrypt API -> Dev Server (certificate request granted)
- Dev Server -> int.m0noc.net DNS (Delete _acme-challenge.simattdev.int.m0noc.net.)
- int.m0noc.net DNS -> Dev Server (Done)
Implementation
In this example I’m running an Apache server on a linux OS. So, first of all we need to add the relevant utilities onto the development server.
sudo apt install certbot bind9-dnsutils
Next we need to ensure that the int.m0noc.net DNS server and the development server have an authentication key to be able to securely update the DNS server. First, on the DNS server we generate the key. In my case named.conf.keys is an existing secured file.
cd /etc/bind
tsig-keygen -a hmac-sha512 simattdev-tbhext02. >> named.conf.keys
Looking at the contents of the command we can see that this is a simple bind key directive (nb: this isn’t the one I used)
key "simattdev-tbhext02." {
        algorithm hmac-sha512;
        secret "9Ei4ivjwYYoHJ/28DdoOwrevEOb+KMnwdQjjSok2fVODruVTjfea2Dhi0n422+mBV33djlk1ps3qRkx4JmeIcQ==";
};
We also need to grant accesses for the key. An example partial configuration for /etc/bind/named.conf.local would be the following.
zone "int.m0noc.net" {
        type master;
        update-policy {
                grant simattdev-tbhext02. name _acme-challenge.simattdev.int.m0noc.net. TXT;
        };
};
Reload bind to pick up the changes
sudo systemctl reload bind9
In order to use certbot in manual mode, we need to create a hook. This can be a separate auth hook and cleanup hook. For demo purposes this cut-down script would work. It would need tayloring to specific naming conventions and targets.
#!/usr/bin/perl -w
my $dnsHost = "simattdev";
my $dnsSelector = $dnsHost . "-tbhext02";
my $dnsAuthRoot = "/etc/m0noc/";
my $dnsKey = $dnsAuthRoot . $dnsSelector . ".key";
my $nsupdateCmd = "|/usr/bin/nsupdate -k " . $dnsKey;
my $cb_all = $ENV{'CERTBOT_ALL_DOMAINS'};
my $cb_auth_out = $ENV{'CERTBOT_AUTH_OUTPUT'};
my $cb_dom = $ENV{'CERTBOT_DOMAIN'};
my $cb_rem = $ENV{'CERTBOT_REMAINING_CHALLENGES'};
my $cb_val = $ENV{'CERTBOT_VALIDATION'};
my $label = (split /\./, $cb_dom)[0];
my $realDom = "_acme-challenge." . $dnsHost . ".int.m0noc.net.";

open(FD,$nsupdateCmd) || die("open()");
if (defined($cb_auth_out)) {
        printf "[I] Clearing challenge from %s\n", $realDom;
        printf FD "del %s TXT\nsend\n", $realDom;
        system("systemctl reload apache2");
} elsif (defined($cb_val)) {
        printf "[I] Writing challenge to %s\n", $realDom;
        printf FD "add %s 3600 TXT %s\nsend\n", $realDom, $cb_val;
} else {
        printf STDERR "[E] Unexpected condition\n";
}
close(FD);
We securely copy the key over to the development server and create a location for the hooks (these commands are not the ideal way but show the layout needed).
sudo mkdir /etc/m0noc
sudo cp certbotHook.pl simattdev-tbhext02.key /etc/m0noc/
sudo chmod 440 /etc/m0noc/simattdev-tbhext02.key
sudo chmod 750 /etc/m0noc/certbotHook.pl
We test that updates work.
sudo /usr/bin/nsupdate -k /etc/m0noc/simattdev-tbhext02.key
> add _acme-challenge.simattdev.int.m0noc.net. 3600 TXT TestingUpdate
> send
> quit
nslookup -query=any _acme-challenge.simattdev.int.m0noc.net.
Server:         XXXXXX.m0noc.net.
Address:        XXXXXX#53

_acme-challenge.simattdev.int.m0noc.net text = "TestingUpdate"
sudo /usr/bin/nsupdate -k /etc/m0noc/simattdev-tbhext02.key
> del _acme-challenge.simattdev.int.m0noc.net. TXT
> send
> quit
Before running certbot we need to consider what options, such as HSTS, we may need. We can then run the command. As I’m behind a proxy I also need to specify that. Subsitute appropriate values as needed.
sudo bash -c "HTTPS_PROXY=http://XX.XX.XX.XX:XX certbot certonly --agree-tos --no-eff-email --manual-public-ip-logging-ok -m YOUREMAIL@DOMAIN --preferred-challenge dns --manual -d dev.simulatedattack.com --manual-auth-hook /etc/m0noc/certbotHook.pl --manual-cleanup-hook /etc/m0noc/certbotHook.pl"
Also, as I’m using a proxy we need to inform the certbot service. We modify /usr/lib/systemd/system/certbot.service to add the environment string (highlighted)
[Unit]
Description=Certbot
Documentation=file:///usr/share/doc/python-certbot-doc/html/index.html
Documentation=https://letsencrypt.readthedocs.io/en/latest/
[Service]
Type=oneshot
Environment="HTTPS_PROXY=http://XX.XX.XX.XX:XX"
ExecStart=/usr/bin/certbot -q renew
PrivateTmp=true
Then reload the config
sudo systemctl daemon-reload
As we are using the manual method, first time round we also need to set up the SSL configuration in Apache (or whichever service you’re using). First, we ensure appropriate modules are enabled.
sudo a2enmod ssl
sudo a2enmod rewrite
We duplicate the original site configuration in /etc/apache2/sites-enabled and edit it to enable SSL. There are many more options needed to secure the site, but this is outside the scope of this posting. Here is a partial configuration.
<VirtualHost *:443>
        ServerName dev.SimulatedAttack.com
        SSLEngine on
        SSLCertificateFile /etc/letsencrypt/live/dev.simulatedattack.com/fullchain.pem
        SSLCertificateKeyFile /etc/letsencrypt/live/dev.simulatedattack.com/privkey.pem
</VirtualHost>
We then update the original site in /etc/apache2/sites-enabled to redirect to the SSL site. The following partial config would be something like this.
<VirtualHost *:80>
        ServerName dev.SimulatedAttack.com
        RewriteEngine on
        RewriteCond %{SERVER_NAME} =dev.SimulatedAttack.com
        RewriteRule ^ https://%{SERVER_NAME}%{REQUEST_URI} [END,NE,R=permanent]
</VirtualHost>
Restart Apache and test.
sudo systemctl restart apache2
Observations
If you’re thinking of using this technique in production then there are many other aspects to consider, such as using more robust code and not a PoC cut-and-paste from the Internet ;-). One of the most important is that we have introduced a new external facing server (int.m0noc.net in this case) that not only needs to be secured, but to a standard commensurate to the main domain (or a level of risk you wish to accept). For example, if the main domain is using DNSSec then if the new DNS path isn’t you have introduced a weakness.
Certainly, as a red-teamer, if I saw this in production I would be interested in the security of the new dns infrastructure.
Even if you are not using this technique, from an offensive point-of-view I would absolutely consider adding the initial CNAME (or NS record) in a target DNS as a method to maintain a level of control over a target if that offered an advantage as part of an engagement. A long-winded way of saying, monitoring changes to your DNS zones is important.
As of writing comments are enabled, but all are moderated, at least until I’m happy with the relevant defences. I hope you enjoyed this introductory post.
Hi M0NOC, glad to see you’re blogging again, I’ve always really liked your technical deep dives and am looking forward to more this year!