Ever wanted to run multiple VPNs at the same time from the same device? Route a client down a different VPN at a boundary linux router?
Introduction
Linux has a wealth of networking capabilities, to the degree that it can operate as quite a powerful router, just without the hardware acceleration you get with a commercial enterprise offering (and the enterprise price tag).
In addition to VRFs (think of it as a separate routing table providing layer3 segregation), linux has the concept of network namespaces (netns). A netns is a separate copy not only of a routing table, but the whole network stack, including firewall rules and network devices. It can handle performing filesystem mounts to present namespace specific networking files such as resolv.conf to applications that use it but are not netns aware.
What we are going to do is set up two VPNs using provider openvpn profiles. These will be segregated using network namespaces, and selectively accessible via our iptables/nft and policy routing directives.
We will then use policy routing for both local host situations, and source devices (where the linux box is a router). This allows us to dictate what uses which VPN and when.
Setup
We will document the steps to manually set up each part. Hooking into your system startup scripts is likely unique for your environment and left as an exercise for the reader, as is the variation for IPv6.
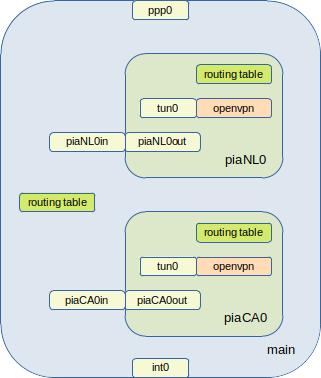
In this diagram we link the main network namespace with the segregated ones via a p2p bridging link. Here you need to choose small IP address ranges that don’t clash with others you or the VPN provider use. We chose /30 ranges out of 192.168.0.0/24 as that is a common commodity router range we don’t use on our net.
If our device isn’t authoritative and own this range then, as we do in this article, we need to deploy NAT to mask this issue.
| Namespace | Outside NIC (NS) | Inside NIC (main) |
| piaNL0 | 192.168.0.1/30 | 192.168.0.2/30 |
| piaCA0 | 192.168.0.5/30 | 192.168.0.6/30 |
We will go through setting up the configuration for netns piaCA0. You can then repeat the steps for all the other VPN’s you wish to add.
First, we need to decide on factors such as which DNS nameservers we are going to use to perform lookups from within the netns. Once decided we can create a file /etc/netns/NAME/resolv.conf. So, in this case, we create one called /etc/netns/piaCA0/resolv.conf.
tbhrt05:~$ cat /etc/netns/piaCA0/resolv.conf
nameserver 1.1.1.1
nameserver 8.8.8.8
We want to create the netns and the bridging link. The “ip link” command allows us to specify the namespace each side resides in. As we are linking into the default namespace, the vpnCA0in side does not specify a namespace. Note also that we can supply the “-n” parameter to specify a namespace to operate in.
ip netns add piaCA0
ip link add piaCA0in type veth peer piaCA0out netns piaCA0
ip link set piaCA0in up
ip -n piaCA0 link set piaCA0out up
Next, we assign addresses to the endpoints.
ip -n piaCA0 address add 192.168.0.5/30 broadcast + dev piaCA0out
ip address add 192.168.0.6/30 broadcast + dev piaCA0in
To see the interfaces in the netns, such as piaCA0out, you need to run the “ip” commands in the context of the netns. For example:
ip -n piaCA0 address
We can verify connectivity via ping. Here we use the “ip netns” command to run arbitrary commands in the context of the netns.
tbhrt05:~$ ping -nc 1 192.168.0.5
PING 192.168.0.5 (192.168.0.5) 56(84) bytes of data.
64 bytes from 192.168.0.5: icmp_seq=1 ttl=64 time=0.220 ms
tbhrt05:~$ sudo ip netns exec piaCA0 ping -nc 1 192.168.0.6
PING 192.168.0.6 (192.168.0.6) 56(84) bytes of data.
64 bytes from 192.168.0.6: icmp_seq=1 ttl=64 time=0.060 ms
As the netns is a complete network stack, it currently does not have a routing table configured. We need to set the default route back to our main namespace.
ip -n piaCA0 route add default via 192.168.0.6
We now need to set up the iptables/nft rules to firewall things off, but also handle things such as NAT translation. This is critical as it allows each VPN process to use whatever private IP ranges it wants (except our p2p link range), even the same ones as the other VPN’s.
We will assume you have a basic firewall setup and are using nft rather than iptables, though the translation between the two is straightforward.
This is also where we quickly get into environment specific quirks. In my environment pretty much everything is denied access to the Internet. You have to use internal DNS servers, proxy servers, and so on. There are exceptions, but we don’t want to add to that list unless needed.
When the VPN is up, anything running in that context should use the specified DNS servers. However, to bootstrap things, the openvpn client needs to resolve the address of the VPN server endpoint. To do that we use destination NAT to redirect packets to the internal DNS servers.
nft add rule nat pre_vpn iifname piaCA0in ip daddr { 1.1.1.1, 8.8.8.8 } dnat to 10.1.1.14
We then need a rule to masquerade (aka NAT based on our servers interface) anything we send to the VPN namespace. This is important for when we are acting as a router.
nft add rule nat post_vpn oifname piaCA0in counter masquerade
The opposite direction is also true. Traffic originating from inside the VPN namespace needs to be NAT’ed, for example VPN packets heading to the our internal DNS servers on int0. You may be able to bind this to specific interfaces as, for example, routes out to the Internet will likely already be NAT’ed if ppp0 is your Internet link.
nft add rule nat post_vpn ip saddr 192.168.0.5 counter masquerade
Next we need to define the firewall rules. The rigorousness of this (how far you lock it down) is a risk-based decision for your environment.
In our setup we create a new chain for traffic outbound from the netns. We limit it to DNS access to the specified DNS servers (we may need to use different ones if we are performing prerouting translations). It can also access the VPN endpoints using the protocol and port specified in the openvpn configuration (look for the “remote” and “proto” directives). As VPN DNS name may be in-flux/rotated we don’t limit destinations IP addresses.
nft add chain filter fwd_piaCA0_all
nft add rule filter fwd_piaCA0_all ip daddr { 1.1.1.1, 8.8.8.8 } meta l4proto { udp, tcp } th dport 53 counter accept
nft add rule filter fwd_piaCA0_all oifname ppp0 udp dport 1197 counter accept
nft add rule filter fwd_piaCA0_all counter drop
In our setup we create a new chain to allow access from external devices that we have approved.
nft add chain filter fwd_all_piaCA0
nft add rule filter fwd_all_piaCA0 ip saddr 10.11.22.33/32 counter accept
nft add rule filter fwd_all_piaCA0 ip saddr 10.44.55.66/32 tcp dport { 80, 443 } counter accept
nft add rule filter fwd_all_piaCA0 counter drop
In both cases we may change “drop” to a new chain that performs logging as well. We then link these rules to our main “vpn” chain, which we already created and exists within the base FORWARD chain (this is hooked into the networking stack).
nft add rule filter fwd_vpn iifname piaCA0in jump fwd_piaCA0_all
nft add rule filter fwd_vpn oifname piaCA0in jump fwd_all_piaCA0
Next, as the netns is a completely new networking stack, it doesn’t have any firewall setup at all. So we need to create the base chain and its hook. Also, as this is more straightforward, we add the details straight into the base chain. tun0 here is the name of the tunnel interface the openvpn process creates. If it is different for your setup, we need to change it.
ip netns exec piaCA0 nft add table ip nat
ip netns exec piaCA0 nft add chain ip nat POSTROUTING { type nat hook postrouting priority srcnat ; policy accept ; }
ip netns exec piaCA0 nft add rule nat POSTROUTING oifname tun0 counter masquerade
If you are not already acting as a router you need to activate forwarding. Again, you may choose specific interfaces via net.ipv4.conf.INTERFACE.forwarding.
sysctl -w net.ipv4.ip_forward=1
ip netns exec piaCA0 sysctl -w net.ipv4.ip_forward=1
Finally, we can set up the routing policy.
Policy Routing
As we are using policy routing, we need to create a separate routing table within the main host (separate from the netns). These are either well-known or numbered (the normal one you see is known as ‘main’ and has an ID of 254).
To create a name we can create a file specific for our netns (the name just has to end with .conf). In our case we assign table 11 to this VPN.
tbhrt05:~$ cat /etc/iproute2/rt_tables.d/piaCA0.conf
11 rt_piaca0
We can then create the policy. First, the obligatory default route points to the VPN netns via the p2p link.
ip route add default via 192.168.0.5 table rt_piaca0
If we are not changing the DNS nameserver remote devices are using, we need to add an exemption for that.
ip route add 10.1.1.14/32 dev int0 table rt_piaca0
We can do other things like add local users into specific netns. Here we have UID 1002. Anything this user does will be over the netns (but not using the netns specific resolv.conf). For example, separate BurpSuite instances.
ip rule add uidrange 1002-1002 table rt_piaca0
To get the netns specific resolver we need to run in the namespace context itself. It depends whether you wish to tunnel the main traffic but monitor DNS or tunnel everything. You can adapt to all these things by tweaking the setup we have just described.
Starting the VPN
We now run the openvpn client with the appropriate openvpn config and other parameters for our VPN.
ip netns exec piaCA0 openvpn –config /etc/m0noc/vpn/pia-strong/ca_ontario.ovpn –auth-user-pass /etc/m0noc/vpn/private/pia-creds.txt –log-append /var/log/vpn/piaCA0.log –writepid /var/local/vpn/piaCA0.pid
The log file shows the VPN is up. We can also check the routing table. Note that if we were using 10.2.110.0/24 internally we would have had issues with a normal setup. This way represents no issue as it is isolated within the netns.
tbhrt05:~$ sudo ip -n piaCA0 route
0.0.0.0/1 via 10.2.110.1 dev tun0
default via 192.168.0.6 dev piaCA0out
10.2.110.0/24 dev tun0 proto kernel scope link src 10.2.110.7
128.0.0.0/1 via 10.2.110.1 dev tun0
149.50.218.57 via 192.168.0.6 dev piaCA0out
192.168.0.4/30 dev piaCA0out proto kernel scope link src 192.168.0.5
A quick test of our policy routing for users (Netherlands, then Canada). As we are IPv6 aware but haven’t set this up for IPv6 yet, we force use over IPv4. In this case, if we don’t do anything for IPv6 it will use the normal routing for IPv6; which may be not what you want.
tbhrt05:~$ sudo -u lowpriv curl -4 https://ioc.sh/ip ; echo
84.247.116.95
tbhrt05:~$ sudo -u lowpriv2 curl -4 https://ioc.sh/ip ; echo
149.50.218.57
As mentioned earlier, if we want full isolation for the process, it will need to run within the context of the netns.
ip netns exec piaCA0 COMMAND
For our remote boxes, we can see the effect of the policy routing.

In the case of remote devices, it depends if it is setup to access the network over IPv6. If it does, then you need to handle that via the ip6 family nft rules.
Finally
We repeat the whole thing for each VPN we wish to run. Once set up we can quickly tweak what accesses the VPN by changing the policy routing rules and, if locked down, the filter rules.
If you are looking at scripting this for your environment, the nft “include” directive supports wildcards just like the shell, so if you have a naming format the VPN script can generate the relevant configuration files that will then get included during next load.